3.35Define Members
After defining the joints, you will be able to define the members using the Process/ Members command.
•From the Process menu, select Members. The dialog box Figure 3-23 appears.
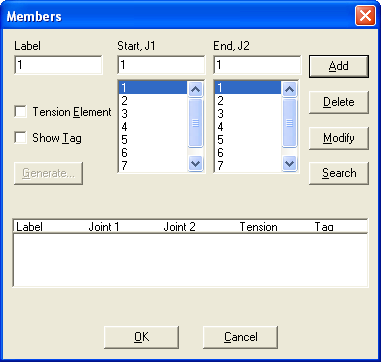
Figure 3-23 Members dialog box
•In the LABEL text box, enter a member label.
•Enter the start joint of the member by either typing its label in the START J1 text box, or by selecting it from the START J1 list box.
•Enter the end joint of the member by either typing its label in the END J2 text box, or by selecting it from the END J2 list box.
•If the member is to be considered a tension-only member, select the TENSION ELEMENT check-box option.
•Select or clear the SHOW TAG option. If the option is clear, the member will be shown or hidden when you toggle the Hide/Show command ON or OFF, respectively. If the option is selected (i.e., the member is tagged), the member will always be shown regardless of the Hide/Show status.
•Choose the ADD button or press ENTER. The data entered are added to the list box at the bottom.
•Repeat the steps above for each member entry you have, making sure that no duplicate labels are entered.
•To edit an entry that has already been added to the list box, select that entry from the list box, modify its values in the text boxes, and choose the MODIFY button.
•To remove an entry that has already been added to the list box, select that entry from the list box and choose the DELETE button.
•Choose OK when done.
Members can be generated by duplicating an already defined member or a group of members, a number of times, while incrementing its or their start and end joints.
•In the MEMBERS dialog box, choose the GENERATE button (this command button will be dimmed if no members are input). The dialog box of Figure 3-24 appears.
•In the FROM MEMBER text box, enter the label of the first member to be copied.
•In the TO MEMBER text box, enter the label of the last member to be copied. If the last member label is the same as the first member label, only that member will be affected by the copying process.

Figure 3-24 Member Generation dialog box
•Enter the increment to be added to the start joint and end joint of each specified member, in the DELTA J1 and DELTA J2 text boxes, respectively.
•In the QUANTITY text box, enter the number of copies to be generated.
•Choose the OK button. The generated members are added to the list box of the MEMBERS dialog box.