3.17Printing Results
After performing a successful run, you may view or print individual member and group results in text or graphical format using the Joint Results, Support Reactions, Member Results, Envelopes, and Group Results commands from the Analyze menu. You may also superimpose results diagrams on the model image using the Results Diagrams command from the Show menu. To print comprehensive text results and input echo, use the File/Print Results command. Your selection of printout can be applied to all or selected members, joints, load combinations, and member groups.
•From the File menu, select Print Results. The dialog box of Figure 3-6 appears.
•To print an input echo, select the check-box options in the INPUT ECHO options group. You can select to print DEFINITIONS (all data input through the Define menu commands), GEOMETRY (joints and members data and their assignments and definitions), and LOADS (applied member and joint loads and load combinations).A selected option contains an  in its check box.
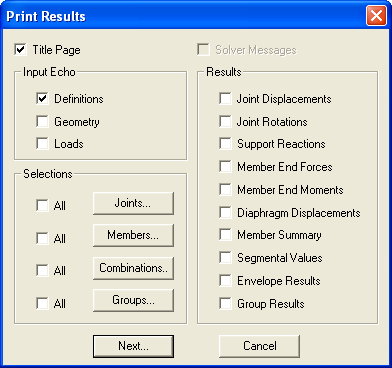
Figure 3-6 Print Results dialog box
•To print the messages generated during the solution process, select the SOLVER MESSAGES check-box option.
•In the RESULTS options group, select the output options to be printed. A selected option contains an X in its check box. You can print the applicable options from the various Results options. These include joint displacements, joint rotations, support reactions, member end forces, member end moments, diaphragm displacements, member summary, segmental values, envelope results, and group results.
•In the SELECTION options group, specify whether the results printing applies to all or selected joints, members, load combinations, or member groups.
3.17.1Printing results for all joints
•Select the check box next to the JOINTS button.
3.17.2Printing results for selected joints only
•Clear the check box next to the JOINTS button.
•Choose the JOINTS button. The dialog box of Figure 3-7 appears.
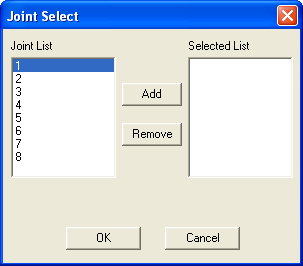
Figure 3-7 Joint Select dialog box
•From the JOINT LIST list box, select the joint whose results you want to print.
•Choose the ADD button. The selected joints are added to the SELECTED LIST list box on the right.
•Repeat the two steps above until all the joints whose results you want to be printed are in the SELECTED LIST list box.
•To remove a joint that has already been added to the list box, select that joint from the list box and choose the REMOVE button.
•Choose the OK button
The selection procedure described for joints above applies to members, load combinations, and member groups.
•Choose the PRINT button.
•A message box appears informing you that the output is being sent to the active printer. Choose the CANCEL button to terminate the print job.