5.25Assign Member Properties
Material, section, and non-prismatic member properties are globally defined using the values entered using the Define/Defaults command. Members that do not have DEFAULT material, section, and non-prismatic properties can be assigned their different properties using the Assign/Member Types command.
•From the Assign menu, choose Member Types. The modeless dialog box of Figure 5-18 appears. To end member type assignment, choose the CLOSE button.
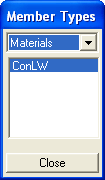
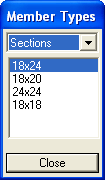
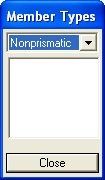
Figure 5-18 Member Types dialog box
•From the drop-down list box, select the assignment type, MATERIALS, SECTIONS, and NONPRISMATIC. The list box displays the available entries of your selection. These entries were defined using the Define/Materials, Define/Sections, and Define/Nonprismatic commands.
•From the list box, select the property to be applied. This becomes the active assignment. All members that share the active assignment are shown in red in the Graphics area. Members with different assignments are shown in black and members with the DEFAULT assignment are shown in green.
•In the Graphics area, using the left-mouse button, marquee select a member or a group of members. To remove the active assignment (apply DEFAULT), do the same using the right-mouse button.
•Repeat the three steps above for each type, Materials, Sections, and Nonprismatic.
•From the Assign menu, choose Refinement. The modeless dialog box of Figure 5-19 appears. This box has two modes, ASSIGN and SHOW. To end refinement assignment, choose the CLOSE button.
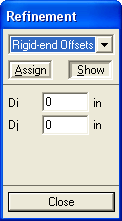
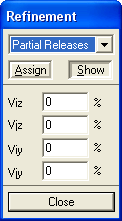
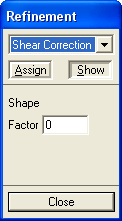
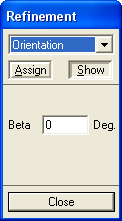
Figure 5-19 Refinement dialog box
•From the drop-down list, select the refinement to be assigned, RIGID-END OFFSETS, PARTIAL RELEASES, SHEAR CORRECTION, and ORIENTATION. The rest of the box displays text boxes that depend on your selection. Some text boxes may not be available, depending on the structure type.
Note: Member Start joint is the one closer to the joint with the lowest coordinates in the entire structure.
•In the available text boxes, enter the information needed. This becomes the active assignment.
•Choose the ASSIGN button. All members that share the active assignment are shown in red in the Graphics area. Members with different assignments are shown in black and joints with no assignment are shown in green.
•In the Graphics area, using the left-mouse button, marquee select a member or a group of members. To remove the assignment, do the same using the right-mouse button.
•Choose the SHOW button.
•In the Graphics area, click on a member near its mid-length (if the Member Labels option is ON, click on the member label to select it). All members that have the same assignment as the selected member are shown in red and the assignment is displayed in the text boxes of the REFINEMENT box.